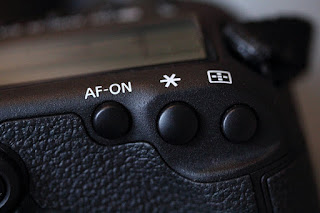
So I was quite surprised to learn about back-button focusing recently, or rather I was surprised that I'd never heard of it before. I'm not one to read through every page of the camera manual when I invest in a new one, but my recent discovery has led me to believe that maybe I should. There's a lot more to these cameras than initially meets the eye. Perhaps I should also buy the "...For Dummy" books.
I stumbled across this functionality when researching the focusing on my new Canon 5D Mark III. Going from a reduced-frame to a full-frame and from 9 to 54 focus points has provided me with some new challenges, and I found I was initially getting quite a few totally out-of-focus shots when I was taking action shots with the new beast. A bit of googling led me to some articles about back-button focusing, and now I'm bemoaning the fact that I'd never discovered this before (or even heard about it) - it's been a function available on Canon cameras for decades!
So, what is it? Simply put, it is focusing using a button at the back of the camera, rather than using the shutter release button to focus.
Okay, so why is it helpful? Well, here's an example of where it comes into its own. You're trying to get a shot of your dog running around the park. In order to take the shot, first you press the shutter button down half-way to get it to focus, and only then can you take the shot. Often by that point the subject's moved out of the focal plane and all you've got is half a blurry tail at the edge of the frame! By splitting the functionality of these two processes (focusing and shooting), you can do each of them independently and simultaneously. This means that you can focus and re-focus continuously while also shooting a series of rapid shots (and with the Canon 5D Mark III this is about 5 frames per second).
The results? Far more control over focusing of the shot as the subject moves, while still being able to take the shots quickly. It basically means that the camera is capable of doing these two separate tasks simultaneously, resulting in a much higher hit rate. That, coupled with the different tracking focus functions on the 5D (for different levels of acceleration/deceleration and rapid changes in direction, etc.) mean that photographing moving subjects is far more successful.
So how do you do it? On the 5D Mark III there are various buttons along the top right at the back of the camera, and the purpose of these buttons can be changed, with different functions assigned to them. A bit of digging around with the different options (custom functions) shows you that all sorts of functions can be assigned (from focus to exposure to image quality to other operational features such as electronic level), but the focusing seems by far the most useful one to me (and the AF-ON button the best one to use, since the other two are pretty useful as AE lock and focus point adjustment).
On the Canon 5D Mark III, then, you have to do the following:
1) Go to Menu, scroll along to the Custom options, then select C.Fn2: Disp.Operation, scroll down to Custom Controls, then press SET
2) With the top left option (Shutter butt. half-press) highlighted press SET, then select "Metering Start", the middle of the options (this removes the focus functionality from the shutter release button). Then press SET again to return to the menu.


3) To set the focus functionality, scroll down one button to the AF-ON option (second on the left hand side) and press SET, then ensure that it's set to "Metering and AF start" on the left hand side - this assigns the focus function to the AF-ON button. Press SET again to register this setting, then press the MENU button a couple of times to come out of the custom function options.


4) Then you're ready to go - you'll need to press the AF-ON button to focus, probably with your thumb. It takes a little time to get used to, but it seems so much more useful and effective, especially if you're taking shots of moving subjects. Even with stationary objects it's a great way to focus. FYI - once you move you finger off the button the focus is set, so this is useful if you want to then re-compose your shot. Remember to tell anyone who borrows your camera!
When shooting moving subjects it's also important to have the AF-DRIVE set to AI SERVO, and useful to have the High Speed Continuous setting on in order to capture as much movement as possible. Another thing to play around with is under the AF options in the menu, which gives you different tracking sensitivity, acceleration/deceleration and AF point auto switching - all of these depending on the type of moving subject that you're trying to capture.
The functions on the Canon 60D (my other camera body) are as follows:
1) Go to Custom Functions and choose option IV; the default (with focusing on the shutter release button) is option 0.

2) To adjust it to assign the AF-ON button with focusing (and removing it from the shutter), scroll down to option 1:
3) Then continue as above, using your thumb to press the AF-ON button to focus and the shutter release button to actually take the shot!
As far as I'm aware, this functionality is available on all the major DSLR bodies. I just wish I'd found it years ago! Please share if you find this useful, or let me know of any other useful tips you have.


Brilliant, what a star you are. I hate manuals and that was very easy. Even for a blonde. haha x
ReplyDelete